Xiaomi Redmi 4X (santoni)
-
This is a port of Ubuntu Touch for the Xiaomi Redmi 4X (santoni).
Sources:
Kernel: https://github.com/ubports-santoni/android_kernel_xiaomi_santoni
Device:
- Device Tree: https://github.com/ubports-santoni/android_device_xiaomi_santoni
- Vendor Blobs: https://github.com/ubports-santoni/android_vendor_xiaomi_santoni
Halium: https://github.com/Halium/halium-devices/blob/halium-7.1/manifests/xiaomi_santoni.xml
Status:
Component Status AppArmor Y Boot into UI Y Camera Y Cellular Calls Y Cellular Data Y GPS Y Sensors Y Sound Y UBPorts Installer Y UBPorts Recovery Y Vibrator Y Wi-Fi Y Bug report / Issues
Please report them to here: https://github.com/ubports-santoni/projectmanagement/issues
Install
Install using UBports installer (GET THE LATEST VERSION):
https://github.com/ubports/ubports-installer/releases -
Video decoding is now fixed!!
 :party_popper:
Please download the latest CI from 17-01-2020.
-
wow, seems like you nearly got it!
nice!
-
Hi @Danct12
I finally got a liltle time to test GPS on the latest build (17. Jan 2020) and it is working (at least with unav).
I have performed the following steps-
Boot in fastboot mode and flash the halium-boot image
-
Boot to recovery and wipe Dalvik/ART Cache, System, Vendor, Data, Cache
-
While in recovery, install the rootfs and system image
-
Reboot to Ubuntu touch and apply the rules for lxc-android-config
-
Reboot to ubuntu, download and install unav from Openstore
-
Unav asks permission for location on first start, accept it
-
Search a destination in unav and press navigate.
-
Unav says "Waiting for GPS signal ..." and after a short time (2~5 minutes), my position was found and I was able to navigate to the destination.
-
-
@keep37 Didn't lxc-android-config rules always applies automatically by default?
-
@Danct12
Sorry, I meant the udev rules for santoni in "/usr/lib/lxc-android-config/"sudo mount -o remount,rw / sudo -i # And enter your password cat /var/lib/lxc/android/rootfs/ueventd*.rc|grep ^/dev|sed -e 's/^\/dev\///'|awk '{printf "ACTION==\"add\", KERNEL==\"%s\", OWNER=\"%s\", GROUP=\"%s\", MODE=\"%s\"\n",$1,$3,$4,$2}' | sed -e 's/\r//' >/usr/lib/lxc-android-config/70-santoni.rules -
ARM64 rootfs is now working on the device! (EXPERIMENTAL)
How to test arm64:
- Download the latest image from CI (06-02-2020)
- Download the latest rootfs from ci.ubports.com.
- Install using halium-install like before and it should boot to ubports without modifications.
It is recommended to wipe data before you switch architecture!!
Otherwise, you can flash the armhf rootfs instead if you aren't interested in trying out experimental features.
-
Is the port still under active development? I'm thinking about buying this phone and if the port is abandoned please tell me so I can buy something like Redmi 6 instead.
-
@Danct12, can You help me with "build system image" from Github Actions?
I need more info what to do after git clone...
Or need to use something from marketplace?
Why don't You share every fresh working image... The easiest way for "noobs like me
Thanks in advance,
Alex -
@keep37 it is possible to use the TWRP recovery, or just the ubport recovery?
-
@aceclan I haven't tried the ubport recovery yet. The TWRP recovery works
-
Thank You @keep37 and also thanks to @Danct12
It is ok , the ADB works in TWRP, but I have problems with hallium-install dependency's and this doesn't work for me:path/to/halium-install -p ut path/to/rootfs.tar.gz path/to/system.img
doesn't work for me.(using manjaro linux)
Do You know other way to install thees two files?
ex.-
extract the rootfs and Install the system.img from TWRP gui?
-
manual install using adb shell ?
(extract steps from hallium install )
)
Alex
-
-
I've succeeded....

-
@aceclan If you get an error, next time please post the output of halium-install.
But in the future, I'll try to make it so that you don't have to depend on a bash script to install, but rather using the official UBports installer.
Or if you don't want that, I'll try to make it into a TWRP recovery zip. Of course, this installation method is not supported by the UBports dev team, but rather me.
-
@linuxadopter Not so much people reported issues, but so far I think the port could be usable for now.
Aside from loudspeaker mode in calls doesn't route to the speaker properly and a few apparmor issues.
-
Dual Boot -> Sysadmin approach :)I am using right now dual boot stock fw / ubport - switching boot from TWRP.
I write down thees steps to my self to remember and for everyone ho would like to try...
Using stock because is good... (dm-verity, rooted , ad-aware .... ) , I could not find any rom with scheduled Power On/Off feature. Needed a solution without wipe. As I understand won't mix the stuff because rootfs.img and system.img is used on ubuntu touch so it will be separated.So try ubuntu for freedom:
Having already an unlocked Redmi4x, with working StockRom, rooted, dm-verity, and TWRP installed.-
Boot to TWRP recovery, Backup ALL stuff including DATA.
-
Copy TWRP folder outside from the phone , ex. to Your desktop.
-
Format Data, to remove encryption, otherwise ubport installer won't work.
-
Copy back the TWRP folder backups to phone and restore stock rom.
-
Fingerprint and unlock won't work so need these steps in recovery mode:
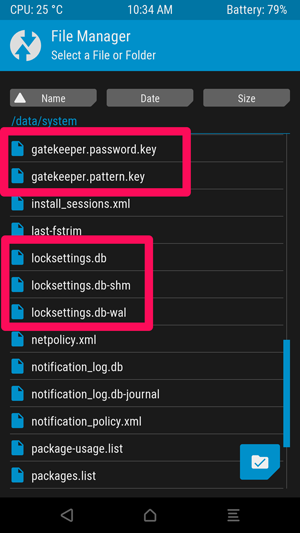
Mount Data, System, and Delete from '/data/system' folder: files with .key extension and files with 'locksettings' keyword. Reboot to system. Everything should be fine , setup up again a security pattern. Fingerprints works after that.

-
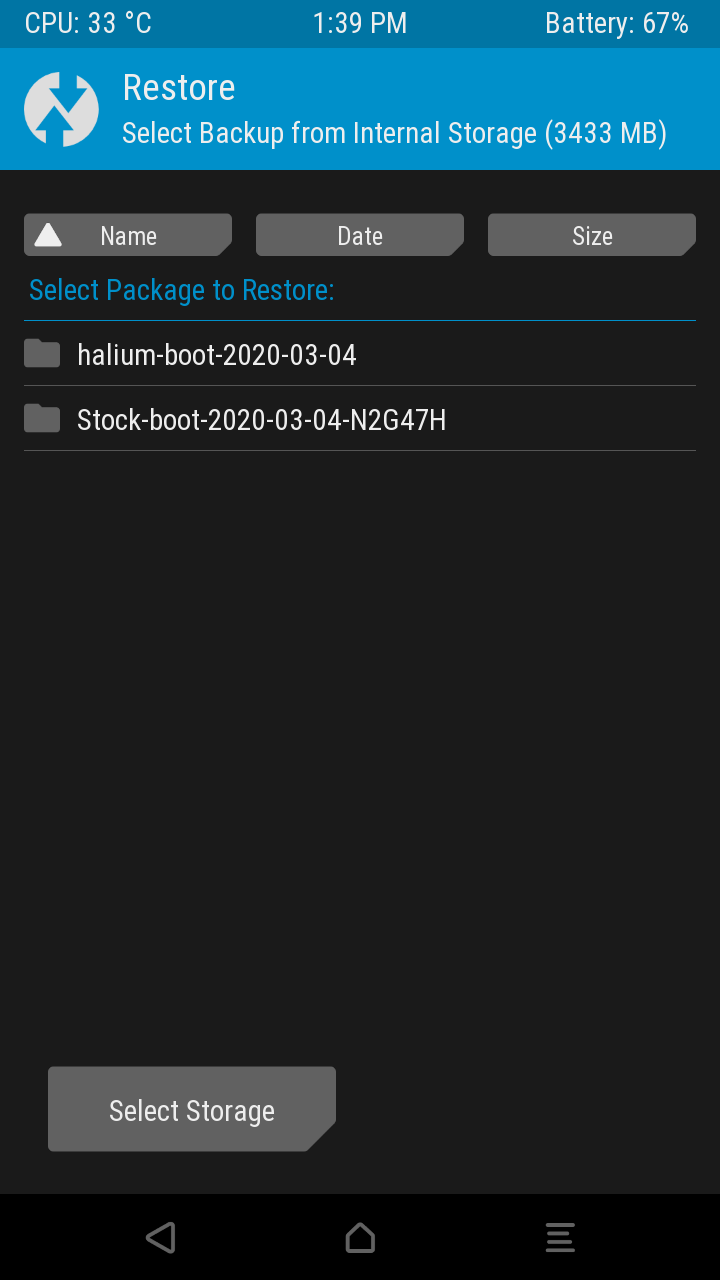
Reboot to recovery and Backup stock Boot partition.
-
Backup to fasboot , flash halium-boot.img.
-
Reboot to Recovery, so ADB recovery is active , flash from Your Desktop:
path/to/halium-install -p ut path/to/rootfs.tar.gz path/to/system.img -
Backup Hallium boot partition.
Now You can switch any time , just restore Boot partition. Enjoy
 .
.
-
-
@aceclan can u explain detail how to flash system.img from twrp?
-
@4htet , if You read again the steps I wrote:
- Reboot to Recovery, so ADB recovery is active , flash from Your Desktop:
path/to/halium-install -p ut path/to/rootfs.tar.gz path/to/system.img
Explain:
When You are in recovery mode and connect the USB cable, the ADB recovery mode is active. (I suppose You already have android SDK, ADB , fastboot tools...)
To check use command:
adb devices
in fastboot :
fastboot devicesso in this step won't flash from TWRP GUI, just use TWRP for adb, and reboot.
How to flash, was specified already by @Danct12 , read here:
http://docs.ubports.com/en/latest/porting/installing-16-04.htmlthe basic is ->
path/to/halium-install -p ut path/to/rootfs.tar.gz path/to/system.img,Best regards,
Alex -
@aceclan Thanks for your reply. I followed your instructions. Now , when the terminal tell me to set password, this message is showing continuously. "chroot: failed to run command 'passwd' : Exec format error failed, please try again"
Edit: Now I know that I cant chroot into rootfs on my redmi4x which means qemu-user-static is not working on my Ubuntu 19.04. Still can`t find the fix for that.
-
Hey, I'm having some problems getting my 4X to boot into UT. I'm on Ubuntu 18.04 and downloaded latest System and Boot image from the Github. I also unlocked my bootloader and flashed newest TWRP. After that, I flashed Halium-Boot through fastboot. After booting back to TWRP( to get ADB to work) I started normally flashing with halium-install.
Everything seems to be fine. It asked me for password and flashed system and rootfs to /data. After that while trying to boot the OS, it just locks up on Mi Logo and on dmesg -w I see:

Here's the last message from Halium-Install:

I really don't know what's the problem here. I tried reformatting /data, /system, /cache etc. and same results, I also tried installing LineageOS 16 (Official) and install ut on top of that but still the same thing.
Any help is appriciated!