UBports Robot Logo UBports Forum
    • Categories
    • Recent
    • Tags
    • Popular
    • Users
    • Groups
    • Search
    • Register
    • Login
    1. Home
    2. Br1
    3. Best
    Offline
    • Profile
    • Following 0
    • Followers 2
    • Topics 8
    • Posts 72
    • Groups 0

    Posts

    Recent Best Controversial
    • [How-To] Record Calls

      Before using these scripts read the DISCLAIMER here.

      To perform this how-to you must be familiar with the command line, as I mentioned in other post ( @klh excuse the off-topic ) I created a service to record all calls.

      The first step is run :

      arecord file.wav
      

      make a call and then stop recording with Ctrl+C

      play recorded call, if voices are not clearly heard unfortunately this how-to is already over 😞

      otherwise you can proceed ...

      • You have to create callrecorder service, to create it mount root in read/write mode :
      sudo mount -o remount,rw /
      

      sudo nano /etc/init.d/callrecorder :

      #! /bin/sh
      
      ### BEGIN INIT INFO
      # Provides:          callrecorder
      # Required-Start:    $local_fs
      # Required-Stop:     &local_fs
      # Default-Start:     2 3 4 5
      # Default-Stop:      0 1 6
      # Short-Description: Call Recorder
      # Description:       Call Recorder Daemon
      ### END INIT INFO
      
      # Written by Br1 <br1@spacelinux.it>
      
      case "$1" in
        start)
          echo "Call recorder starting ..."
          bash -c 'cd /home/phablet/.callrec/ && ./prepare-sh &'
         ;;
        stop)
          pkill manager.sh ; pkill ini.sh ; pkill ter.sh ; pkill ris.sh ;
          rm /home/phablet/.callrec/CallRecorder/.*swp 2> /dev/null ;
          rm /home/phablet/aRam/Rec_Call/.*swp 2> /dev/null ;
      
          echo "Call recorder stopped !"
          ;;
      
        *)
          echo "Usage: sudo service callrecorder {start|stop}"
          exit 1
          ;;
      esac
      
      exit 0
      

      and set permission with : sudo chmod 755 /etc/init.d/callrecorder

      enable autostart with : sudo update-rc.d callrecorder defaults
      ( if you want disable it : sudo update-rc.d -f callrecorder remove)

      • you have to create 3 directories :
        /home/phablet/aRam
        /home/phablet/.callrec
        /home/phablet/MyRec

      • and you also have to create 5 scripts :

      1 - nano /home phablet/.callrec/prepare-sh :

      #!/bin/sh
      
      # ----- start/stop service section -----
      #
      # check service status
      if ps aux | grep -q "[m]anager.sh" ; then echo "    ! Service already running !" ; exit
      
      fi
      
      # check if ramdisk is mounted and exec scripts
      if grep -qs '/phablet/aRam ' /proc/mounts ; then cd /home/phablet/aRam/Rec_Call ; ./manager.sh & ./ini.sh & ./ter.sh & ./ris.sh & exit 
      
      fi
      
      # ----- boot section ----- 
      #
      /bin/sleep 10 ;
      
      # clear cache and buffer
      sh -c "free && sync && echo 3 > /proc/sys/vm/drop_caches && free" ;
      
      # create ramdisk
      mount -t tmpfs -o size=200M tmpfs /home/phablet/aRam ;
      
      # create directory
      mkdir -p /home/phablet/aRam/Rec_Call ;
      
      # copy scripts to directory just created
      cp -rp /home/phablet/.callrec/*.sh /home/phablet/aRam/Rec_Call ;
      
      # and exec them
      cd /home/phablet/aRam/Rec_Call ; ./manager.sh & ./ini.sh & ./ter.sh & ./ris.sh &
      
      exit
      

      2 - nano /home/phablet/.callrec/manager.sh :

      #!/bin/sh
      
      while true
      
      do
      
      FL1=/home/phablet/aRam/Rec_Call/fl1 ;
      FL2=/home/phablet/aRam/Rec_Call/fl2 ;
      FL3=/home/phablet/aRam/Rec_Call/fl3 ;
      RecDir=/home/phablet/MyRec ;
      HomDir=/home/phablet/aRam/Rec_Call ;
      
      # if fl1 exist ini.sh intercepted outgoing or incoming call
      if [ -f "$FL1" ]; then
      	# deletes temporary file and starts recording as phablet user (with .new extension)
      	rm -f $FL1 ; su phablet -s /usr/bin/arecord /home/phablet/MyRec/"$(date +%d_%m_%y__%H_%M_%S)".wav.new &
      fi
      
      # if fl2 exist call has ended 
      if [ -f "$FL2" ]; then
      	# deletes the temporary file and stop recording
      	rm -f $FL2 ; pkill -f arecord ; sleep 0.2 ;
      	# if fl3 exist call was answered
      	if [ -f "$FL3" ]; then
      		# delete .new extension and exec three scripts
      		rm -f $FL3 ; mv $RecDir/*.new $RecDir/"$(date +%d_%m_%y__%H_%M_%S)".wav ;  $HomDir/ini.sh & $HomDir/ter.sh & $HomDir/ris.sh &
      		else
      		# call was not answered
      		# delete recording and exec two scripts
      		rm $RecDir/*.new ; $HomDir/ini.sh & $HomDir/ter.sh &
      	fi
      
      fi
      
      sleep 1 ;
      
      done ;
      

      3 - nano /home/phablet/.callrec/ini.sh :

      #!/bin/sh
      
      cd /home/phablet/aRam/Rec_Call ;
      
      inicmline="dbus-monitor --system interface=org.ofono.VoiceCallManager member=CallAdded" ;
      
      $inicmline | while read line
      do
          echo $line | grep "incoming\|dialing"
              if [ "$?" -eq "0" ]; then
              echo "";/bin/touch fl1;echo "";
              break
          fi
      done
      

      4 - nano /home/phablet/.callrec/ter.sh :

      #!/bin/sh
      
      cd /home/phablet/aRam/Rec_Call ;
      
      tercmline="dbus-monitor --system interface=org.ofono.VoiceCall member=PropertyChanged" ;
      
      $tercmline | while read line
      do
          echo $line | grep "disconnected"
              if [ "$?" -eq "0" ]; then
              echo "";/bin/touch fl2;echo "";
              break
          fi
      done
      

      5 - nano /home/phablet/.callrec/ris.sh :

      #!/bin/sh
      
      cd /home/phablet/aRam/Rec_Call ;
      
      riscmline="dbus-monitor --system interface=org.ofono.VoiceCall member=PropertyChanged" ;
      
      $riscmline | while read line
      do
          echo $line | grep "StartTime"
              if [ "$?" -eq "0" ]; then
              echo "";/bin/touch fl3;echo "";
              break
          fi
      done
      

      make all scripts executable with chmod u+x

      • you can start the service with : sudo service callrecorder start
        or reboot device

      -------- overview --- how it works --------

      • callrecorder service run prepare-sh script and allows you to stop the execution by terminating 4 running processes
      • prepare-sh creates ramdisk in order to speed up read/write operations, copies 4 scripts on ramdisk and executes them, some more details in scripts comments (any text after a hash sign '#')

      I was planning to make a single script always running and it didn't work, so I created a four scripts system :

      • manager.sh handles three child/processes scripts, each of them intercepts a string (dbus-monitor) creates temporary file and exit

      • ini.sh intercepts outgoing and incoming calls

      • ris.sh intercepts the start of phone communication (call was answered)

      • ter.sh intercepts the end of phone communication

      the last two would suffice, however, starting the recording at the beginning of phone communication, sometimes 1/2 seconds are lost ... so I preferred to start the recording on outgoing/incoming calls (if there is no answer recording is deleted)

      Calls are recorded in uncompressed format (wav) but if you periodically delete the recordings there will be no problems ... I prefer to convert them (to ogg format) daily with crontab managed script, if you want I attach it, but it will be necessary install ffmpeg (via apt), I will complete it to delete recordings older than 40 days.

      I hope I did not forget anything ... English is not my natural language, if something is not clear, you ask and I will try to explain better.

      I have not detected abnormal battery drain, maybe these scripts can be improved, anyway callrecorder service works fine on my Xiaomi Mi A2.

      I want to say Thanks to all volunteers working on UBports project, having linux on a smartphone is very rewarding 🙂

      posted in Support
      Br1B
      Br1
    • [HowTo] Block unwanted calls - create blacklist

      I've been using this script handled by upstart for a week, I have not detected abnormal battery consumption, the call block is so fast that my Xiaomi MI A2 does not ring 🙂 ... should also work on other devices.

      • Create a new contact and call it SPAM, add to it the numbers you want to block

      • Create a script
        "nano /home/phablet/.myscripts/calls_blocker.sh"
        and make it executable (chmod u+x)

      #!/bin/bash
      
      # Intercepts every incoming call addressed to SPAM contact and terminates it
      
      interface=org.freedesktop.DBus.Properties
      member=Set
      
      sudo dbus-monitor --system interface=$interface member=$member | awk '/SPAM/ {
          system("dbus-send --system --print-reply --dest=org.ofono /ril_0/voicecall01 org.ofono.VoiceCall.Hangup") 1>/dev/null
        }'
      

      my data SIM in in slot 1(ril_0) if your data SIM is in slot 2 change "/ril_0" to "/ril_1"
      (check with : nmcli c)

      • you need to run sudo dbus-monitor without password, to do this, mount system in rw mode (1) :
      sudo mount -o remount,rw /
      
      • run sudo visudo add this line and save
      phablet ALL=(ALL) NOPASSWD: /usr/bin/dbus-monitor
      
      • Create an upstart session job
        "nano /home/phablet/.config/upstart/calls-blocker.conf"
      description "Calls Blocker"
      
      start on started dbus
      stop on stopped dbus
      
      exec /home/phablet/.myscripts/calls_blocker.sh
      
      • Start it
      start calls-blocker
      

      other upstart commands here

      (1) These changes can cause problems with OTA updates, you must keep track of all changes and restore the operating system before the OTA updates

      Thanks to @c4pp4 for this topic

      posted in Support
      Br1B
      Br1
    • RE: Call/number blocking wish list

      @roese-leo if you need to record a call, you can use recorder app, set keep screen on and try, on my xiaomi MI A2 interlocutor's voice is clearly heard.

      I noticed with surprise that this command line also works fine :

      arecord file.wav
      

      and I created a service/script that record all calls, I've been using it for 2 days, it seems to work, I need to make some changes and test it for a few weeks ...then I'll make a how-to, those familiar with the command line will be able to try it out.

      posted in General
      Br1B
      Br1
    • RE: [HowTo] Block unwanted calls - create blacklist

      --------- update ---------

      To fix security issue mentioned by @klh, I have created an init.d service.

      • Create a new contact and call it SPAM, add to it the numbers you want to block

      • First script
        nano /home/phablet/.myscripts/calls_blocker.sh
        and make it executable (chmod u+x)

      #!/bin/bash
      
      # Intercepts every incoming call addressed to SPAM contact and terminates it
      
      interface=org.freedesktop.DBus.Properties
      member=Set
      
      dbus-monitor --system interface=$interface member=$member | awk '/SPAM/ {
          system("dbus-send --system --print-reply --dest=org.ofono /ril_0/voicecall01 org.ofono.VoiceCall.Hangup") 1>/dev/null
        }'
      
      • Second script
        nano /home/phablet/.myscripts/stop_blocker.sh
        (chmod u+x)
      #!/bin/bash
      
      # stop process gracefully
      
      pkill dbus-monitor
      
      exit
      
      • mount system in rw mode
      sudo mount -o remount,rw /
      
      • create service
        sudo nano /etc/init.d/blacklist
        and set permissions (sudo chmod 755)
      #! /bin/bash
      
      ### BEGIN INIT INFO
      # Provides:          blacklist
      # Required-Start:    dbus
      # Required-Stop:     dbus
      # Default-Start:     2 3 4 5
      # Default-Stop:      0 1 6
      # Short-Description: Blocks calls
      # Description:       Daemon that blocks unwanted calls
      ### END INIT INFO
      
      # Written by Br1 <br1@spacelinux.it>
      
      case "$1" in
        start)
          echo "Starting blacklist service ..."
          bash -c 'cd /home/phablet/.aa_myscripts/ && ./calls_blocker.sh &'
          ;;
        stop)
          echo "Stopping blacklist service ..."
          bash -c 'cd /home/phablet/.aa_myscripts/ && ./stop_blocker.sh &'
          sleep 2
          ;;
        *)
          echo "Usage: /etc/init.d/blacklist {start|stop}"
          exit 1
          ;;
      esac
      
      exit 0
      
      
      • start or stop service with
      sudo service blacklist start 
      # or
      sudo service blacklist stop
      
      • enable service auto start on boot up
      sudo update-rc.d blacklist defaults
      
      • if you want disable service auto start on boot up
      sudo update-rc.d -f blacklist remove
      
      • check if service/dbus-monitor is running
      ps -e | grep dbus-monitor
      
      posted in Support
      Br1B
      Br1
    • RE: Change DNS servers, wifi and mobile data

      --------- UPDATE ---------
      New version to install/uninstall with single command, see here for further information.

      You can set alternative dns servers and restore the default settings in an easy way, reboot not required.

      You can switch between two preset providers or enter the one you prefer.

      three steps :

      1 - download (just click) set-dns.1.01.tar.gz from here

      2 - open file manager, go to Downloads, click set-dns.1.01.tar.gz and extract archive

      3 - open terminal and type :

      sudo Downloads/set-dns.1.01/setdns.sh
      

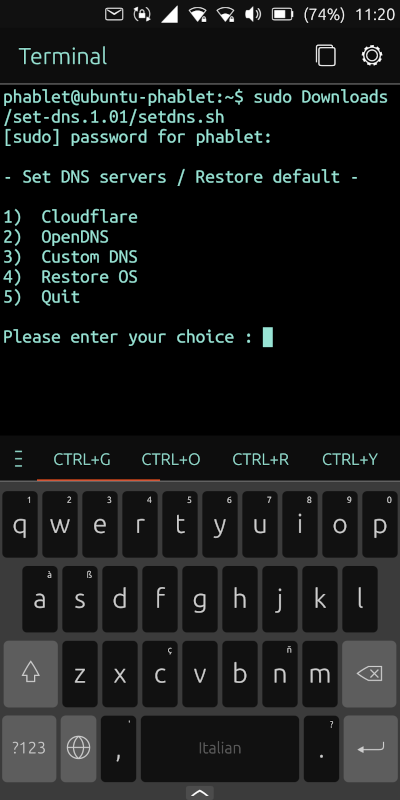
      You will see this :

      screenshot_0228_400.png

      type 1 to set Cloudflare servers
      type 2 to set OpenDNS servers
      type 3 to set your preferred servers (*)
      type 4 to restore default settings (Restore OS)
      type 5 to exit (OS unchanged)

      Remember to "Restore OS" before the next OTA update !

      Preview :

      #!/bin/bash
      
      # Make sure only root can run this script
      if [ "$(id -u)" != "0" ]; then
         echo " - You must prepend 'sudo' !" 1>&2
         exit 1
      fi
      
      echo -e '\n- Set DNS servers / Restore default -\n' ;
      
      # these are Cloudflare's DNS servers
      CLF_one=1.1.1.1
      CLF_two=1.0.0.1
      
      # these are OpenDNS servers
      OPE_one=208.67.222.222
      OPE_two=208.67.220.220
      
      PS3='
      Please enter your choice : '
      options=(" Cloudflare" " OpenDNS" " Custom DNS" " Restore OS" " Quit")
      select opt in "${options[@]}"
      do
      	case $opt in
      	" Cloudflare")
      		# search the default string
      		if grep -qs 'dns=dnsmasq' /etc/NetworkManager/NetworkManager.conf
      
      		then
      
      			# -------------------- runs if found default dns settings -------------------- 
      
      			# mount root in read/write mode
      			mount -o remount,rw / ;
      
      			# remove /etc/resolv.conf (is a symbolic link pointing to /run/resolvconf/resolv.conf)
      			rm /etc/resolv.conf ;
      
      			# create /etc/resolv.conf
      			touch /etc/resolv.conf ;
      
      			# add it Cloudflare servers
      			echo -e "nameserver $CLF_one\nnameserver $CLF_two" >> /etc/resolv.conf ;
      
      			# set permission
      			chmod 644 /etc/resolv.conf ;
      
      			# make it immutable
      			chattr +i /etc/resolv.conf ;
      
      			# replace dns=dnsmasq  with  dns=none in NetworkManager conf file
      			sed -i 's/dns=dnsmasq/dns=none/' /etc/NetworkManager/NetworkManager.conf ;
      
      			# remount root in read only mode
      			mount -o remount,ro / ;
      
      			echo -e '\n Cloudflare DNS are set up !\n'
      
      			exit 0
      
      		else
      
      			# -------------------- runs if dns settings are already changed --------------------
      
      			# mount root in read/write mode
      			mount -o remount,rw / ;
      
      			# makes /etc/resolv.conf writable/erasable
      			chattr -i /etc/resolv.conf ;
      
      			# add it Cloudflare servers
      			echo -e "nameserver $CLF_one\nnameserver $CLF_two" > /etc/resolv.conf ;
      
      			# make it immutable
      			chattr +i /etc/resolv.conf ;
      
                             # remount root in read only mode
                              mount -o remount,ro / ;
      
      			echo -e '\n Cloudflare DNS are set up !\n'
      
      			exit 0
      
      		fi
      
      		;;
      
      	" OpenDNS")
      		# search the default string
      		if grep -qs 'dns=dnsmasq' /etc/NetworkManager/NetworkManager.conf
      
      		then
      
      			# -------------------- runs if found default dns settings -------------------- 
      
      			# mount root in read/write mode
      			mount -o remount,rw / ;
      
      			# remove /etc/resolv.conf (is a symbolic link pointing to /run/resolvconf/resolv.conf)
      			rm /etc/resolv.conf ;
      
      			# create /etc/resolv.conf
      			touch /etc/resolv.conf ;
      
      			# add it OpenDNS servers
      			echo -e "nameserver $OPE_one\nnameserver $OPE_two" >> /etc/resolv.conf ;
      
      			# set permission
      			chmod 644 /etc/resolv.conf ;
      
      			# make it immutable
      			chattr +i /etc/resolv.conf ;
      
      			# replace dns=dnsmasq  with  dns=none in NetworkManager conf file
      			sed -i 's/dns=dnsmasq/dns=none/' /etc/NetworkManager/NetworkManager.conf ;
      
      			# remount root in read only mode
      			mount -o remount,ro / ;
      
      			echo -e '\n OpenDNS Servers are set up !\n'
      
      			exit 0
      
      		else
      
      			# -------------------- runs if dns settings are already changed --------------------
      
      			# mount root in read/write mode
      			mount -o remount,rw / ;
      
      			# makes /etc/resolv.conf writable/erasable
      			chattr -i /etc/resolv.conf ;
      
      			# add it OpenDNS servers
      			echo -e "nameserver $OPE_one\nnameserver $OPE_two" > /etc/resolv.conf ;
      
      			# make it immutable
      			chattr +i /etc/resolv.conf ;
      
                             # remount root in read only mode
                              mount -o remount,ro / ;
      
      			echo -e '\n OpenDNS Servers are set up !\n'
      
      			exit 0
      
      		fi
      
      		;;
      
      	" Custom DNS")
      		# search the default string
      		if grep -qs 'dns=dnsmasq' /etc/NetworkManager/NetworkManager.conf
      
      		then
      
      			# -------------------- runs if found default dns settings -------------------- 
      
      			# mount root in read/write mode
      			mount -o remount,rw / ;
      
      			# remove /etc/resolv.conf (is a symbolic link pointing to /run/resolvconf/resolv.conf)
      			rm /etc/resolv.conf ;
      
      			# create /etc/resolv.conf
      			touch /etc/resolv.conf ;
      
                                              read -p " Type primary server : " priDN
      
      					echo -e "nameserver $priDN" > /etc/resolv.conf ;
      
      					read -p " Type secondary server : " secDN
      
      					echo -e "nameserver $secDN" >> /etc/resolv.conf ;
      
      			# set permission
      			chmod 644 /etc/resolv.conf ;
      
      			# make it immutable
      			chattr +i /etc/resolv.conf ;
      
      			# replace dns=dnsmasq  with  dns=none in NetworkManager conf file
      			sed -i 's/dns=dnsmasq/dns=none/' /etc/NetworkManager/NetworkManager.conf ;
      
      			# remount root in read only mode
      			mount -o remount,ro / ;
      
      			echo -e '\n Custom DNS are set up !\n'
      
      			exit 0
      
      		else
      
      			# -------------------- runs if dns settings are already changed --------------------
      
      			# mount root in read/write mode
      			mount -o remount,rw / ;
      
      			# makes /etc/resolv.conf writable/erasable
      			chattr -i /etc/resolv.conf ;
      
                                              read -p " Type primary server : " priDN
      
                                              echo -e "nameserver $priDN" > /etc/resolv.conf ;
      
                                              read -p " Type secondary server : " secDN
      
                                              echo -e "nameserver $secDN" >> /etc/resolv.conf ;
      
      
      			# make it immutable
      			chattr +i /etc/resolv.conf ;
      
                             # remount root in read only mode
                              mount -o remount,ro / ;
      
      			echo -e '\n Custom DNS are set up !\n'
      
      			exit 0
      
      		fi
      
      		;;
      
      	" Restore OS")
      			# mount root in read/write mode
      			mount -o remount,rw / ;
      
      			# makes /etc/resolv.conf writable/erasable
      			chattr -i /etc/resolv.conf ;
      
      			# remove it
      			rm /etc/resolv.conf ;
      
      			# recreate  original simbolic link
      			ln -s /run/resolvconf/resolv.conf /etc/resolv.conf ;
      
      			# replace dns=none  with  dns=dnsmasq in NetworkManager conf file
      			sed -i 's/dns=none/dns=dnsmasq/' /etc/NetworkManager/NetworkManager.conf ;
      
                             # remount root in read only mode
                              mount -o remount,ro / ;
      
                             # restart daemon
                              service network-manager restart ;
      
      			echo -e '\n Default settings have been restored !\n'
      
      			exit 0
      
      		;;
              " Quit")
      			echo -e '\n OS unchanged !\n'
      
      			break
      		;;
      			*) echo "invalid option $REPLY"
      		;;
          esac
      done
      

      (*) For example, if you want to set Google DNS servers enter 8.8.8.8 as primary server and 8.8.4.4 as secondary server.

      posted in Support
      Br1B
      Br1
    • How enable "tap to wake" on startup

      If you already created a systemd user service to execute some commands on startup you must only add this line to bash script :

      dbus-send --system --print-reply --dest=com.canonical.Unity.Screen /com/canonical/Unity/Screen com.canonical.Unity.Screen.setDoubleTapToWakeEnabled boolean:true
      
      posted in Google Pixel 3a/3a XL
      Br1B
      Br1
    • RE: [How-To] Record Calls

      --------- update ---------

      @domubpkm said in [How-To] Record Calls:

      As it stands, this will only be of interest to qualified users

      I've made it as easy as possible, only three steps :

      • first, use morph browser to download( just click) callrecorder.tar.gz from here (in addition to above scripts contains callrec-install script)

      • second, open file manager, go to Downloads click callrecorder.tar.gz and select extract archive

      • third, to run callrec-install open terminal and type :

      sudo Downloads/callrecorder/callrec-install
      

      callrec-install script will ask you to choose :

      type 1 to install callrecorder (reboot required)
      type 2 to uninstall it
      type 3 to exit from script

      you don't have to do anything else.

      Recorded calls are in MyRec directory, at device startup prepare.sh script will delete any that are older than 30 days.

      I recommend running callrec-install to uninstall callrecorder before proceeding to ota update.

      This is callrec-install script :

      #!/bin/bash
      
      CRSERV=/etc/init.d/callrecorder ;
      
      # Make sure only root can run this script
      if [ "$(id -u)" != "0" ]; then
         echo "    Must be run as root, you must prepend sudo !" 1>&2
         exit 1
      fi
      
      echo -e '\n - You can install / uninstall CallRecorder -\n' ;
      
      PS3='Please enter your choice : '
      options=("Install" "Uninstall" "Quit")
      select opt in "${options[@]}"
      do
      	case $opt in
      	"Install")
      
       			echo -e '\n Installation in progress ...\n' ;
      
      			# creates 3 directories
      			su phablet -s /bin/mkdir /home/phablet/{.callrec,aRam,MyRec} ;
      			
      			cp /home/phablet/Downloads/callrecorder/* /home/phablet/.callrec/ ;
      
      			# change the working directory
      			cd /home/phablet/.callrec ;
      
      			# mount root in read/write mode
      			mount -o remount,rw / ;
      
      			# copy callrecorder service and enable autostart
      			cp callrecorder /etc/init.d/ ; update-rc.d callrecorder defaults ;
      
      			# roll back root in read only mode
      			mount -o remount,ro / ;
      
      			echo -e ' Installed, reboot your device !\n' ;
      			
      			exit 0
      
      		;;
      
      	"Uninstall")
      
      			# check status
      			if [ ! -f "$CRSERV" ]; then
      
      			echo -e '\n CallRecorder is not installed !\n' ; break
      
      			else
      
      			# mount root in read/write mode
      			mount -o remount,rw / ;
      
      			# stop callrecorder, disable autostart and remove service file
      			service callrecorder stop ; update-rc.d -f callrecorder remove ; rm /etc/init.d/callrecorder ;
      
      			# roll back root in read only mode
      			mount -o remount,ro / ;
      
      			# delete scripts and remove directories
      			rm -rf /home/phablet/.callrec/* ; rmdir /home/phablet/.callrec ;
      			rm -rf /home/phablet/MyRec/* ; rmdir /home/phablet/MyRec ;
      			rm -rf /home/phablet/aRam/* ;
      
      			echo -e '\n Done, CallRecorder uninstalled !\n'
      
      			exit 0
      
      			fi
      
      		;;
      
              "Quit")
      			break
      		;;
      			*) echo "invalid option $REPLY"
      		;;
          esac
      done
      
      posted in Support
      Br1B
      Br1
    • RE: [How-To] Record Calls

      @domubpkm Between ota 25 (xenial) and the RC release there could be many differences ... I will try to adapt call-recorder to Focal OTA-2 Stable, but no promises.

      posted in Support
      Br1B
      Br1
    • RE: Install-Uninstall scripts with Single Command
      • edit 31/08/2023
        My scripts have been tested on the stable channel , I can’t guarantee they’ll work on other channels, use them at your own risk.

      • short installation video :
        https://www.spacelinux.it/video/installing-callrec.mp4

      posted in General
      Br1B
      Br1
    • RE: [HowTo] Block unwanted calls - create blacklist

      --------- UPDATE ---------
      New version to install/uninstall with single command, see here for further information.

      The old version has to be manually uninstalled before.

      There are no new features but should be running much faster and draw less battery power (*)

      three steps :

      1 - download (just click) blacklist.1.01.tar.gz from here

      2 - open file manager, go to Downloads click blacklist.1.01.tar.gz and extract archive

      3 - open terminal and type :

      sudo /home/phablet/Downloads/blacklist.1.01/blist-install
      

      type 1 to install
      type 2 to uninstall
      type 3 to exit

      That's all.

      Preview of install/uninstall script (blist-install) :

      #!/bin/bash
      
      BLSERV=/etc/init.d/blacklist ;
      
      # Make sure only root can run this script
      if [ "$(id -u)" != "0" ]; then
         echo "    Must be run as root, you must prepend sudo !" 1>&2 ; exit 1
      fi
      
      echo -e '\n - Install/uninstall BlackList :\n' ;
      
      PS3='Please enter your choice : '
      options=("Install" "Uninstall" "Quit")
      select opt in "${options[@]}"
      do
      	case $opt in
      	"Install")
      
       			echo -e '\n Installation in progress ...\n' ;
      
      			# change the working directory
      			cd /home/phablet/Downloads/blacklist.1.01/ ;
      			
      			# create directory
      			mkdir -p /home/phablet/.blacklist ;
      
      			# copy scripts to directory just created 			
      			cp *.sh /home/phablet/.blacklist/ ;
      			
      			# mount root in read/write mode
      			mount -o remount,rw / ;
      			
      			# copy blacklist service
      			cp blacklist /etc/init.d/ ;
      			
      			# enable autostart
      			update-rc.d blacklist defaults ;
      			
      			# start service
      			service blacklist start
      			
      			# roll back root in read only mode
      			mount -o remount,ro / ;
      
      			echo -e '\n Done, Blacklist installed !\n'
      			
      			exit 0
      
      		;;
      
      	"Uninstall")
      
      			# check status
      			if [ ! -f "$BLSERV" ]; then
      
      			echo -e '\n Blacklist is not installed !\n' ;
      
      			else
      
      			# mount root in read/write mode
      			mount -o remount,rw / ;
      
      			# stop blacklist service, disable autostart and remove file
      			service blacklist stop ; update-rc.d -f blacklist remove ; rm /etc/init.d/blacklist ;
      
      			# roll back root in read only mode
      			mount -o remount,ro / ;
      
      			# delete scripts and remove directory
      			rm -rf /home/phablet/.blacklist/* ; rmdir /home/phablet/.blacklist ;
      
      			echo -e '\n Blacklist uninstalled !\n'
      
      			exit 0
      
      			fi
      
      		;;
      
              "Quit")
      			exit 0
      		;;
      			*) echo "invalid option $REPLY"
      		;;
          esac
      done
      
      
      • small changes to make more efficient the script (now named sr-kill.sh) useful to stop blacklist service from command line :
      #!/bin/sh
      
      # stop blacklist service
      
      # get pid of the script
      scPID=$(pidof -x calls_blocker.sh)
      
      # kill script and child processes
      pkill -P $scPID
      
      exit


      (*) Now the always running script (calls_blocker.sh) is executed by dash shell which is much faster and requires fewer resources than bash shell, see benchmark , here is the preview :

      #!/bin/sh
      
      # Intercepts every incoming call addressed to SPAM contact and terminates it
      
      interface=org.freedesktop.DBus.Properties
      member=Set
      
      sudo dbus-monitor --system interface=$interface member=$member | awk '/SPAM/ {
         system("dbus-send --system --print-reply --dest=org.ofono /ril_0/voicecall01 org.ofono.VoiceCall.Hangup") }' >/dev/null 2>&1
      
      
      posted in Support
      Br1B
      Br1
    • RE: [How-To] Record Calls

      OTA-25 --- You can reinstall, no changes are necessary.

      posted in Support
      Br1B
      Br1
    • RE: [How-To] Record Calls

      --------- UPDATE ---------

      I am glad you enjoyed 🙂 ... new version to install/uninstall with single command, see here for further information.

      The previous version must be uninstalled and the device rebooted, but first save the recorded calls or they will be deleted.

      New features :

      • install script asks you how many days you want to keep recorded calls, hit enter for default (30 days)
        if you later decide to change, repeat the installation (in this case reboot not required)

      • recorded calls are named with their recording start time

      three steps :

      1 - download (just click) callrecorder.1.02.tar.gz from here

      2 - open file manager, go to Downloads click callrecorder.1.02.tar.gz and select extract archive

      3 - open terminal and type :

      sudo /home/phablet/Downloads/callrecorder.1.02/callrec-install
      

      type 1 to install
      type 2 to uninstall
      type 3 to exit

      and reboot, that's all.

      Changelog :

      I added a new script that is run daily by crontab, keep-rec-sh :

      #!/bin/bash
      # 
      days=+30
      # delete recordings older than ... days
      find /home/phablet/MyRec/* -mtime $days -exec rm {} \; 2> /dev/null ;
      

      preview of the new version of callrec_install :

      #!/bin/bash
      
      CRSERV=/etc/init.d/callrecorder ;
      
      # Make sure only root can run this script
      if [ "$(id -u)" != "0" ]; then
         echo "    Must be run as root, you must prepend sudo !" 1>&2 ; exit 1
      fi
      
      echo -e '\n - Install/uninstall CallRecorder :\n' ;
      
      PS3='Please enter your choice : '
      options=("Install" "Uninstall" "Quit")
      select opt in "${options[@]}"
      do
      	case $opt in
      	"Install")
      
      			#   -------------------- already installed section ------------------------------
      
      			crontab -l | grep -q 'keep-rec-sh' ;
      
      			if [ $? = 0 ] ; then
      
                                              echo -e '\n Recorded calls : auto erase them after' ;
      
                                              read -p " how many days ? (hit enter for 30) : " days
      
      					# --------------- default days section --------------------------
      
      					#if pressed ENTER set default days
      					if [ ${#days} -eq 0 ];	then days=+30 ;
      
      					# remove + for echo message
      					myString="${days:1}" ; echo -e "\n  - Will be deleted after $myString days. \n" ;
      
      					# replaces the third line
      					sed -i "3s/.*/days=$days/" /home/phablet/.callrec/keep-rec-sh ;
      
      					exit 0
      
      					else	# -------- custom days section  -------------------------
      
      					echo -e "\n  - Will be deleted after $days days. \n" ;
      
      					days=+$days ;
      
      					# replaces the third line
      					sed -i "3s/.*/days=$days/" /home/phablet/.callrec/keep-rec-sh ;
      
      					exit 0
      
      					fi
      
      
      			fi
      
      			#   ----------- end already installed -------------------------------------------
      
      
      			# ------------- new install section ---------------------------------------------
      
      
      			# creates 3 directories
      			mkdir -p /home/phablet/.callrec ;
      			mkdir -p /home/phablet/MyRec ;
      			mkdir -p /home/phablet/.cr_Ram ;
      
      			cp /home/phablet/Downloads/callrecorder.1.02/* /home/phablet/.callrec/ ;
      
      			# change the working directory
      			cd /home/phablet/.callrec ;
      
      			# mount root in read/write mode
      			mount -o remount,rw / ;
      
      			# set daily check at 11 am
      			crontab -l > cron_bkp ; echo "0 11 * * * /home/phablet/.callrec/keep-rec-sh >/dev/null 2>&1" >> cron_bkp ;
      			crontab /home/phablet/.callrec/cron_bkp ; rm /home/phablet/.callrec/cron_bkp ;
      
      			# copy callrecorder service and enable autostart
      			cp callrecorder /etc/init.d/ ; update-rc.d callrecorder defaults ;
      
                                              echo -e '\n Recorded calls : auto erase them after' ;
      
                                              read -p " how many days ? (hit enter for 30) : " days
      
      						# --------------- default days section ------------------
      
      						#if pressed ENTER set default days
      						if [ ${#days} -eq 0 ];	then days=+30 ;
      
      						# remove + for echo message
      						myString="${days:1}" ; echo -e "\n  - Will be deleted after $myString days. \n" ;
      
      						# replaces the third line
      						sed -i "3s/.*/days=$days/" /home/phablet/.callrec/keep-rec-sh ;
      
      						else  # -------- custom days section --------------------
      
      						echo -e "\n  - Will be deleted after $days days. \n" ;
      
      						days=+$days ;
      
      						# replaces the third line
      						sed -i "3s/.*/days=$days/" /home/phablet/.callrec/keep-rec-sh ;
      
      						fi
      
      			# roll back root in read only mode
      			mount -o remount,ro / ;
      
      			echo -e '\n Installed, reboot your device !\n' ;
      
      			exit 0
      
      		;;
      
      	"Uninstall")
      
      			# check status
      			if [ ! -f "$CRSERV" ]; then
      
      			echo -e '\n CallRecorder is not installed !\n' ; exit 1
      
      			else
      
      			# mount root in read/write mode
      			mount -o remount,rw / ;
      
      			# stop callrecorder, disable autostart and remove service file
      			service callrecorder stop ; update-rc.d -f callrecorder remove ; rm /etc/init.d/callrecorder ;
      
      			# remove line from crontab
      			crontab -l | grep -v 'keep-rec-sh' | crontab - ;
      
      			# roll back root in read only mode
      			mount -o remount,ro / ;
      
      			# delete scripts and remove directories
      			rm -rf /home/phablet/.callrec/* ; rmdir /home/phablet/.callrec ;
      			rm -rf /home/phablet/.cr_Ram/* ;
      
      			echo -e '\n Uninstalled, reboot your device !\n'
      
      			exit 0
      
      			fi
      
      		;;
      
              "Quit")
      			exit 0
      		;;
      			*) echo "invalid option $REPLY"
      		;;
          esac
      done


      and preview of new version of manager.sh :

      #!/bin/sh
      
      while true
      
      do
      
      FL1=/home/phablet/.cr_Ram/Rec_Call/fl1 ;
      FL2=/home/phablet/.cr_Ram/Rec_Call/fl2 ;
      FL3=/home/phablet/.cr_Ram/Rec_Call/fl3 ;
      RecDir=/home/phablet/MyRec ;
      HomDir=/home/phablet/.cr_Ram/Rec_Call ;
      
      # if fl1 exist ini.sh intercepted outgoing or incoming call
      if [ -f "$FL1" ]; then
      	#
      	setName=$(date +'%d-%m-%Y_%H:%M:%S') ;
      	# deletes temporary file and starts recording as phablet user (with .new extension)
      	rm -f $FL1 ; su phablet -s /usr/bin/arecord /home/phablet/MyRec/"$(date +%H_%M_%S)".wav.new &
      fi
      
      # if fl2 exist call has ended
      if [ -f "$FL2" ]; then
      	# deletes the temporary file and stop recording
      	rm -f $FL2 ; pkill -f arecord ; sleep 0.2 ;
      	# if fl3 exist call was answered
      	if [ -f "$FL3" ]; then
      		#
      		FLN=$(cat /home/phablet/.cr_Ram/Rec_Call/fln) ;
      		# delete .new extension and exec three scripts
      		rm -f $FL3 ; mv $RecDir/*.new $RecDir/$setName.wav ;  $HomDir/ini.sh & $HomDir/ter.sh & $HomDir/ris.sh &
      		else
      		# call was not answered
      		# delete recording and exec two scripts
      		rm $RecDir/*.new ; $HomDir/ini.sh & $HomDir/ter.sh &
      	fi
      
      fi
      
      sleep 1 ;
      
      done ;


      . small differences in other scripts (new paths)

      . now uninstall procedure does not delete recorded calls

      . the working directory is now hidden (.cr_Ram)

      . the previous version is available here

      posted in Support
      Br1B
      Br1
    • RE: [HowTo] Block unwanted calls - create blacklist

      ---- UPDATE OTA-2 Focal ----
      ---- Stable Channel ----

      Usual three steps :

      1 - download (just tap) blacklist-ota.2 from here

      2 - open file manager, go to Downloads tap blacklist-ota.2.tar.gz and tap extract archive

      3 - open terminal, type :

      sudo Downloads/blacklist-ota.2/blist-install
      

      and hit enter,

      type 1 + enter to install

      type 2 + enter to uninstall

      reboot not required.


      Blacklist only consist of three files :

      preview of blist-install :

      #!/bin/bash
      
      BLSERV=/usr/lib/systemd/system/blacklist.service ;
      
      # Make sure only root can run this script
      if [ "$(id -u)" != "0" ]; then
         echo "    Must be run as root, you must prepend sudo !" 1>&2 ; exit 1
      fi
      
      echo -e '\n  -  Install-Uninstall BlackList :\n' ;
      
      PS3=$'
      Please enter your choice : '
      options=("  Install    -       " "  Uninstall  -       " "  Quit       -       ")
      
      select opt in "${options[@]}"
      do
      	case $opt in
      	"  Install    -       ")
      
       			echo -e '\n Installation in progress ...\n' ;
      
      			# change the working directory
      			cd /home/phablet/Downloads/blacklist-ota.2/ ;
      
      			# create directory
      			mkdir -p /home/phablet/.blacklist ;
      
      			# copy scripts to directory just created
      			cp calls_blocker.sh /home/phablet/.blacklist/ ;
      
      			# mount root in read/write mode
      			mount -o remount,rw / ;
      
      			# copy blacklist service
      			cp blacklist.service /usr/lib/systemd/system/ ;
      
      			# enable and start service
      			systemctl enable --now blacklist > /dev/null 2>&1 ;
      
      			# roll back root in read only mode
      			mount -o remount,ro / ;
      
      			echo -e '\n Done, Blacklist installed !\n'
      
      			exit 0
      
      		;;
      
      	"  Uninstall  -       ")
      
      			# check status
      			if [ ! -f "$BLSERV" ]; then
      
      			echo -e '\n Blacklist is not installed !\n' ;
      
      			else
      
      			# mount root in read/write mode
      			mount -o remount,rw / ;
      
      			# stop and disable blacklist service
      			systemctl disable --now blacklist > /dev/null 2>&1 ;
      
      			# remove file
      			rm /usr/lib/systemd/system/blacklist.service ;
      
      			# roll back root in read only mode
      			mount -o remount,ro / ;
      
      			# delete scripts and remove directory
      			rm -rf /home/phablet/.blacklist/* ; rmdir /home/phablet/.blacklist ;
      
      			echo -e '\n Blacklist uninstalled !\n'
      
      			exit 0
      
      			fi
      
      		;;
      
              "  Quit       -       ")
      			echo -e '\n - OS unchanged !\n'
      
      			exit 0
      		;;
      			*) echo "invalid option $REPLY"
      		;;
          esac
      done
      

      preview of blacklist.service :

      [Unit]
      Description=Calls Blacklist
      
      [Service]
      Type=simple
      ExecStart=/home/phablet/.blacklist/calls_blocker.sh
      RemainAfterExit=yes
      
      [Install]
      WantedBy=multi-user.target


      calls_blocker.sh script has not changed.

      The script to stop service is no longer necessary, blacklist now is a systemd service and can be managed with systemctl commands, example :

      systemctl stop blacklist
      

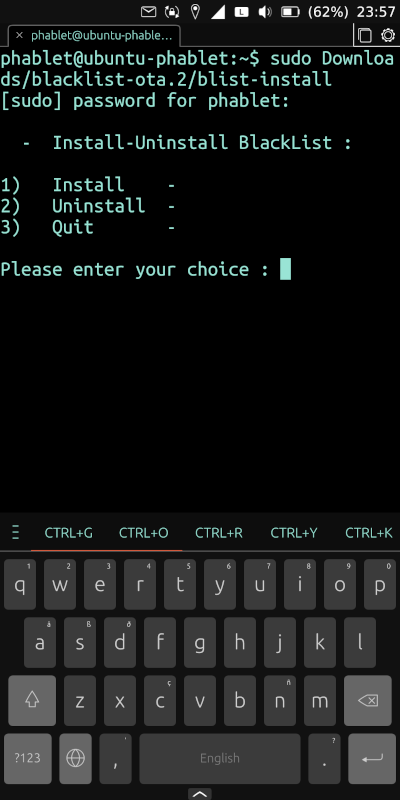
      improved legibility :
      screenshot20230912.png

      posted in Support
      Br1B
      Br1
    • RE: Change DNS servers, wifi and mobile data

      ---- UPDATE OTA-2 Focal ----
      ---- Stable Channel ----

      Usual three steps :

      1 - download (just tap) setdns-ota.2 from here

      2 - open file manager, go to Downloads, tap setdns-ota.2.tar.gz and tap extract archive

      3 - open terminal, type :

      sudo Downloads/setdns-ota.2/setdns-ota.2.sh
      

      and hit enter,

      type 1 + enter to set Cloudflare servers
      type 2 + enter to set OpenDNS servers
      type 3 + enter to set custom servers (*)
      type 4 + enter to restore default settings (Restore OS)
      type 5 + enter to exit (OS unchanged)

      Remember to "Restore OS" before the next OTA update !

      set-dns is one single script, preview :

      #!/bin/bash
      
      # Make sure only root can run this script
      if [ "$(id -u)" != "0" ]; then
         echo " - You must prepend 'sudo' !" 1>&2
         exit 1
      fi
      
      echo -e '\n- Set DNS servers / Restore default -\n' ;
      
      rsv_cnf=/etc/resolv.conf ;
      
      # these are Cloudflare's DNS servers
      CLF_one=1.1.1.1
      CLF_two=1.0.0.1
      
      # these are OpenDNS servers
      OPE_one=208.67.222.222
      OPE_two=208.67.220.220
      
      PS3='
      Please enter your choice : '
      options=("  Cloudflare  -      " "  OpenDNS     -      " "  Custom DNS  -      " "  Restore OS  -      " "  Quit        -      ")
      select opt in "${options[@]}"
      do
      	case $opt in
      	"  Cloudflare  -      ")
      		# check resolv.conf
      		if [ ! -L $rsv_cnf ] ;
      
      		then
      
      			# -------------------- runs if resolv.conf is a file --------------------
      
      			# mount root in read/write mode
      			mount -o remount,rw / ;
      
      			# add it Cloudflare servers
      			echo -e "# Cloudflare servers" > $rsv_cnf ; echo -e "nameserver $CLF_one" >> $rsv_cnf ; echo -e "nameserver $CLF_two" >> $rsv_cnf ;
      
      			# remount root in read only mode
      			mount -o remount,ro / ;
      
      			echo -e '\n Cloudflare DNS are set up !\n'
      
      			exit 0
      
      		else
      
      			# -------------------- runs if resolv.conf is a symbolic link --------------------
      
      			# mount root in read/write mode
      			mount -o remount,rw / ;
      
      			# delete symbolic link
      			rm /etc/resolv.conf ;
      
      			# create file
      			touch /etc/resolv.conf ;
      
      			# add it Cloudflare servers
      			echo -e "# Cloudflare servers" > $rsv_cnf ; echo -e "nameserver $CLF_one" >> $rsv_cnf ; echo -e "nameserver $CLF_two" >> $rsv_cnf ;
      
                             # remount root in read only mode
                              mount -o remount,ro / ;
      
      			echo -e '\n Cloudflare DNS are set up !\n'
      
      			exit 0
      
      		fi
      
      		;;
      
      	"  OpenDNS     -      ")
      		# check resolv.conf
      		if [ ! -L $rsv_cnf ] ;
      
      		then
      
      			# -------------------- runs if resolv.conf is a file --------------------
      
      			# mount root in read/write mode
      			mount -o remount,rw / ;
      
      			# add it Cloudflare servers
      			echo -e "# OpenDNS servers" > $rsv_cnf ; echo -e "nameserver $OPE_one" >> $rsv_cnf ; echo -e "nameserver $OPE_two" >> $rsv_cnf ;
      
      			# remount root in read only mode
      			mount -o remount,ro / ;
      
      			echo -e '\n OpenDNS servers are set up !\n'
      
      			exit 0
      
      		else
      
      			# -------------------- runs if resolv.conf is a symbolic link --------------------
      
      			# mount root in read/write mode
      			mount -o remount,rw / ;
      
      			# delete symbolic link
      			rm /etc/resolv.conf ;
      
      			# create file
      			touch /etc/resolv.conf ;
      
      			# add it Cloudflare servers
      			echo -e "# OpenDNS servers" > $rsv_cnf ; echo -e "nameserver $OPE_one" >> $rsv_cnf ; echo -e "nameserver $OPE_two" >> $rsv_cnf ;
      
                             # remount root in read only mode
                              mount -o remount,ro / ;
      
      			echo -e '\n OpenDNS servers are set up !\n'
      
      			exit 0
      
      		fi
      
      		;;
      
      	"  Custom DNS  -      ")
      		# check resolv.conf
      		if [ ! -L $rsv_cnf ] ;
      
      		then
      
      			# -------------------- runs if resolv.conf is a file -------------------- 
      
      			# mount root in read/write mode
      			mount -o remount,rw / ;
      
      			echo -e "# Custom DNS servers" > $rsv_cnf ; 
      
                                              read -p " Type primary server : " priDN
      
      					echo -e "nameserver $priDN" >> $rsv_cnf ;
      
      					read -p " Type secondary server : " secDN
      
      					echo -e "nameserver $secDN" >> $rsv_cnf ;
      
      			# remount root in read only mode
      			mount -o remount,ro / ;
      
      			echo -e '\n Custom DNS are set up !\n'
      
      			exit 0
      
      		else
      
      			# -------------------- runs if resolv.conf is a symbolic link --------------------
      
      			# mount root in read/write mode
      			mount -o remount,rw / ;
      
      			# delete symbolic link
      			rm /etc/resolv.conf ;
      
      			# create file
      			touch /etc/resolv.conf ;
      
      			echo -e "# Custom DNS servers" > $rsv_cnf ;
      
                                              read -p " Type primary server : " priDN
      
                                              echo -e "nameserver $priDN" >> $rsv_cnf ;
      
                                              read -p " Type secondary server : " secDN
      
                                              echo -e "nameserver $secDN" >> $rsv_cnf ;
      
                             # remount root in read only mode
                              mount -o remount,ro / ;
      
      			echo -e '\n Custom DNS are set up !\n'
      
      			exit 0
      
      		fi
      
      		;;
      
      	"  Restore OS  -      ")
      			# mount root in read/write mode
      			mount -o remount,rw / ;
      
      			# delete file
      			rm /etc/resolv.conf ;
      
      			# recreate symbolic link
      			ln -s /run/systemd/resolve/stub-resolv.conf /etc/resolv.conf ;
      
                             # remount root in read only mode
                              mount -o remount,ro / ;
      
      			echo -e '\n Default settings have been Restored !\n'
      
      			exit 0
      
      		;;
              "  Quit        -      ")
      			echo -e '\n  - OS unchanged !\n'
      
      			break
      		;;
      			*) echo "invalid option $REPLY"
      		;;
          esac
      done


      (*) For example, if you want to set Google DNS servers enter 8.8.8.8 as primary server and 8.8.4.4 as secondary server.

      posted in Support
      Br1B
      Br1
    • NGINX web server on Libertine, it works :-)

      It's in autostart (static web page) and works even when the screen is off : http://libertine.ddns.net:88

      As far as I know, the ip address provided by mobile network operators usually does not allow to host a site, I used the static ip of my vpn (openvpn installed on my vps) so when my Xiaomi is connected to my vpn (is disconnected only when I it use as a hotspot) site will be online.

      posted in Libertine
      Br1B
      Br1
    • Install-Uninstall scripts with Single Command

      Using a shell script that can be easily performed from terminal app (single command) you can install or uninstall all the scripts required by the feature we want to add to our os, I’ve already created one for record calls, soon I’ll make one for block unwanted calls, and for change DNS servers, I'll refer to this topic for details.

      To use these shell scripts two steps and, of course, one command :

      • first, use morph browser to download (just tap the given link) archive.tar.gz containing scripts

      • second, open file manager, go to Downloads tap archive.tar.gz and "Extract archive"

      • and finally open terminal and run the given command

      it will ask you to choose :

      type 1 to install
      type 2 to uninstall
      type 3 to exit

      to uninstall app just rerun command and type 2, that's all.

      ! Remember to rerun it to uninstall before OTA update !

      • After OTA update I will check if it still works and confirm it, otherwise I will try to fix it.

      • I will show a preview of each script and I will explain how it works

      • Scripts contain comments to explain the code (any text after a hash sign '#')

      • Scripts use only already installed programs (no apt)

      posted in General
      Br1B
      Br1
    • RE: Network Places is empty in file manager app

      @dln949 I have enabled sudo mount / umount without password (visudo) then created my.desktop file in .local/share/applications :

      [Desktop Entry]
      Version=1.0
      Type=Application
      Terminal=false
      Exec=aa-exec /home/phablet/aa_myfiles/myscripts/samba.sh
      Icon=/home/phablet/.local/share/icons/smb.png
      Name=Samba
      X-Ubuntu-Touch=true
      X-Ubuntu-Default-Department-ID=accessories
      

      my simple script :

      #!/bin/bash
      
      if grep -qs '/phablet/SAMBA ' /proc/mounts ;
       
         then   sudo umount /home/phablet/SAMBA ;
      
         else   sudo mount -t cifs //192.168.your.ip/remote-path -o guest,nosetuids,noperm,rw /home/phablet/SAMBA
          
      fi
      
      exit


      one tap for mount or umount (if already mounted) on my Redmi Note 4X it works fine.

      First try mount from command line.

      posted in Support
      Br1B
      Br1
    • RE: Install-Uninstall scripts with Single Command

      OTA 5 test, blacklist, callrecorder, and change dns servers, all the scripts have been tested and are working fine.

      I don't know if I'll have time to test them again for future updates, use them at your own risk, a wrong dns configuration and your os might become unusable.

      I suggest to make a total backup before proceeding.

      posted in General
      Br1B
      Br1
    • RE: [How-To] Record Calls

      @domubpkm said in [How-To] Record Calls:

      Perhaps the option should be provided:

      I'll work on it ...

      automatically erase recordings after ... days (between 0 and 30 days) ? 0 = never

      You can use uText app " Edit and save every file on your Phone" ... open filemanager and go to .callrec directory then click prepare.sh , open with uText app and find this line :

      find /home/phablet/MyRec/* -mtime +30 -exec rm {} \; 2> /dev/null ;
      

      replace "30" with days you want

      or if you want to disable automatically erase you have to prepend the line with hash sign '#'

      # find /home/phablet/MyRec/* -mtime +30 -exec rm {} \; 2> /dev/null ;ù
      

      and save file, anyway wav is an uncompressed format, a rough estimate, 1-hour call about 30 megabytes ...

      posted in Support
      Br1B
      Br1
    • RE: Opening ports for WiFi access point

      @pulsar33 said in Opening ports for WiFi access point:

      If the problem comes from the ISP

      Almost certainly the problem comes from the ISP ... read here ... " most mobile operators do not provide dedicated IP addresses – they perform "1:many" NAT, not just 1:1 NAT, and the external address is simultaneously used by multiple customers (just like your home router shares your external addresses between all LAN devices).

      Even those operators which do dedicate an address per customer (whether direct or 1:1 NATed) frequently put it behind a firewall which blocks all incoming connections. This has two purposes – it prevents the customer from hosting services on their 4G connection (which is usually not allowed by their terms of service), and it prevents various botnet scans and unsolicited connections from draining the device's battery "

      posted in Support
      Br1B
      Br1